Beautiful and simple Mushroom applique. Templates can be obtained for free. Details in my post here.
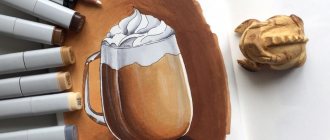
Hello. Lately, creativity, or rather drawing videos on YouTube, makes me happy and gives me energy. I was looking for information on painting on T-shirts and came across incredibly original coffee paintings. Сoffee-art is an original technique for creating paintings using coffee. Today it is becoming more and more popular. Coffee-loving artists can master any subject matter, from self-portraits to translations of masterpieces of world art into the language of coffee. Coffee drawings on paper are unusual and admirable. And it’s easy to draw, watch the detailed video tutorials.
What material to use to draw a cup of coffee
In any drawing, it is important to work with materials that are convenient for you. After all, it is the comfort of work that determines whether you will enjoy the process of creating a picture.
Choose a material to your taste - it can be simple pencils, soft graphic materials, watercolors, felt-tip pens.
At the same time, when performing any drawing, take a responsible approach to the choice of paper. When working with a simple pencil, choose a dense, smooth base; on such a surface the pencil will glide easily and will not leave dirty marks.
When working with soft graphic materials such as sanguine, sauce, pastel or charcoal, give preference to porous, rough paper. Its structure will retain the pigment and the design will be bright and rich.
Drawing the outline of a mug
Drawing the outline of a mug
Of course, everyone dreams that their drawing will turn out beautiful, so you need to try to follow all the instructions with precision. So, we need to try to connect the neck of our cup with its bottom. To do this, we will draw lines that will look slightly tapering downwards.
If you wish to give your mug a slightly different shape, I do not mind, but on the contrary, I only welcome your decision. This lesson gives you the opportunity to learn how to draw a mug step by step, and in turn, tells you where you might make a mistake. When performing this step, you will want to make sure that both sides of the cup are drawn symmetrically.
Looking carefully at my picture, you can see that the left side of the cup is slightly different from the right, as it is narrower. Now you need to make markings, or rather the location of the handle.
What rules should you follow when drawing a cup of coffee?
To correctly depict a cup, you need to learn how to correctly draw simple geometric shapes. This can be learned in academic drawing classes.
In order for the cup to look realistic, it is necessary to correctly draw the ellipses and their opening, to understand how the position of the object and the viewing angle affect changes in the image.
Pay attention to composition. Even the simplest drawing can be turned into a masterpiece, and the most skillfully designed into a failure.
Place the item close to the top edge of the canvas. This composition is always pleasing to the eye, feel free to add additional elements, but do not overload the image.
Coffee creative
Paintings made from coffee are attracting more and more attention and gaining their army of fans, but no matter how unusual the material for painting - coffee - is, there is always room for creative thinking and non-standard solutions in creativity. It is precisely these original finds in the world of coffee art that we share with you.
Aroma Festival
Every year the Aroma Festival takes place in Sydney - a real mystery of coffee and in its name. At one of these festivals, two portraits were presented, which have already gone down in the history of art as one of the most unusual paintings made from coffee.
Portraits of Mona Lisa and Marilyn Monroe - some of the most mysterious and beautiful women in the history of mankind - were made from ordinary coffee cups. To achieve the desired shades, milk was mixed into the coffee. In total, almost 9,000 cups, about 1,000 liters of coffee and almost the same amount of milk were needed.
Coffee cup mark
Hong Yi fundamentally ignores the use of brushes and traditional paints to produce his always unusual and notorious paintings. The coffee painting was no exception.
For the image, the artist used marks from coffee cups, which are layered on top of each other, like shading in graphic works, allowing her to achieve the necessary shades of shadow and light.
Well, the ways you can use coffee to create creative works are almost endless. It's just a matter of imagination and desire in creativity.
Author: Galina Smolnikova
How to draw a cup of coffee with a simple pencil
Let's look at an example of a classic cup image from above. This drawing will be realistic, we will work on the shading and light and shadow relationships. To work you will need:
- a simple pencil;
- eraser;
- thick paper.
Stage 1
Let's start with the construction of the cup drawing. There are two large round elements in the picture - the top of the cup and the saucer. Due to the distortions in the picture, we depict them in the form of ellipses, and the opening of the saucer will be greater.
Stage 2
Drawing shape and volume. We form the rim of the cup - the closer the rim is to us, the wider it is. At the same time, we remember that we see the volume of the inside. Draw a spoon.
Stage 3
Erase the initial construction lines and add volume to the saucer. We draw the level of coffee in the cup with a semi-ellipse.
Stage 4
Let's start shading. The darkest area of the coffee is closer to us, all areas that are in the shade will be darker and more contrasting than the rest.
Grain to grain
Why not make pictures out of coffee? These can be either simple pictures for fragrant postcards or large full-scale panels. Instead of paints, when making such coffee paintings, coffee beans of varying degrees of roasting are used and, therefore, of different shades from light beige to almost black. Coffee paintings are a great way to spend time with benefit and pleasure. And the result will be wonderful decorative works that can be used to decorate both your home and office.
One world. One family. One coffee
For example, Saimir Strati from Albania even set a world record by creating a picture of coffee “One World. One family. One coffee,” spending a huge amount of beans weighing approximately 140 kg. The painting is located in the capital of Albania - Tirana.
Chasing records
However, very soon his record was broken by our compatriot Arkady Kim, who posted a picture of coffee in the Central Park of Culture and Culture named after. Gorky, Moscow, measuring 30 square meters and weighing 240 kg. But this coffee painting is not destined to be a record holder for long, since Saimir Strati has already accepted the challenge and is working on a new large-scale panel that could end up on the pages of the Guinness Book.
How to draw a cup of coffee with children quickly
Here are some examples of quick sketches. At the same time, all our cups will have human features. Let's start with the cup with the mustache.
Stage 1
We start working from the top, draw an ellipse and the volume of the cup. It has fairly thick walls.
Stage 2
We finish drawing the entire cup. The bottom of the cup should be a semi-oval, this will help make the cup voluminous.
Stage 3
We finish drawing funny elements - eyes and mustaches.
Stage 4
We work in color. At the same time, we remember that round shapes have light, shadow and partial shade.
Drawing of a cup with coffee and marshmallows
Stage 1
Draw a low round cup. Remember that all lines should be round and soft.
Stage 2
Draw the parts of the cup's face.
Stage 3
Add marshmallows. At the same time, we depict them not just as rectangles. We also see their volume.
Stage 4
We color our image with markers, paint or colored pencils.
A glass of coffee is suitable for little ones, since there is no transfer of volume in the construction.
Stage 1
Draw the shape of a glass.
Stage 2
Add the lid and eyes.
Stage 3
Add color to our drawing.
How I create coffee drawings on paper
Greetings to all! I really, really love to draw, especially with coffee solution on paper. My first experiments with coffee on paper appeared in 2010. At that time I couldn’t drink coffee at all, and I decided to try drawing with it to feel my favorite aroma. Happened! Now I can’t stop. I’m experimenting with adding cocoa, chicory, vanilla, cinnamon, sugar. I combine coffee with watercolors.
I decided to make this little master class on coffee drawings so that anyone could try to create their own fragrant fairy tale. It's not difficult: you'll need coffee, brushes, high-quality watercolor paper, clean water, napkins, and a frame with glass.
First, you need to prepare a coffee solution for drawing. I tried boiling ground coffee until thick, but now I use a simplified recipe. I take instant granulated coffee (it’s important that it’s not the cheapest) and add enough water to make a creamy mass. I definitely give it time to settle, then the solution becomes uniformly glossy and syrupy without any bubbles or undissolved granules.
Synthetic brushes are suitable: round and oval, thin (No. 2, 4) and thicker (No. 8, for example). Natural round brushes will also work.
Paper is a material on which you definitely shouldn’t skimp. The density should be 270-300 g/m2 (ordinary watercolor paper - about 200 g/m2 - will not work). I use a good French torchon, it has cotton fibers added to it, suitable for wet watercolors and for coffee drawings, of course. I like paper from Fontaine, Lana, and Canson.
Water is needed to adjust the tone. If a dark shade is required, take the coffee solution in its pure form; if a lighter tone is required, dilute it with water. It turns out a wonderful sepia stretch in color.
Napkins are useful for blotting off excess moisture from brushes.
Well, at the end you need to protect the dried drawing with glass and frame it. If this is not done, the drawing may deteriorate from moisture. Unplanned droplets leave light spots and streaks on the image. It is not necessary to fix the drawing with varnish, because... Coffee under glass is preserved perfectly, but the varnish can ruin all the charm of the aroma of a coffee masterpiece.
So, the materials are ready. Let's get started. First the background. We moisten the paper with clean water, and then apply coffee with a wide brush or a piece of padding polyester, in my example quite evenly. Let's wait a little until the background dries a little. Now, in the most general terms, with spots, we denote the composition of the picture. From light to dark, from general to specific. More and more details and richness of tone. The last drawing is done with a thin brush over the dried drawing. To get light highlights, you can use another move: drop water on top of the coffee and quickly blot it with a napkin - a light spot will remain.
Here are step-by-step photos of a bouquet of sunflowers (the last image is scanned, so the color difference is):
The desire to experiment and a creative mood help! A new MK is planned 
With best wishes, Yulia Grechukhina.
Ideas for beginners.
After such a detailed theory, I can’t wait to start practicing and learn how to make drawings on coffee.
Lesson 1. Heart.
Make a circle with a milk stream from the pitcher, then, without stopping, cross it diagonally. A few precise movements are enough, as experienced baristas do, and the drawing is ready.
Lesson 2. Bunny.
Using the pitcher, we make a circle and above it a heart of the same size. Using a skewer or toothpick, draw eyes, a nose, a mouth and antennae in a circle. We admire how the hare’s funny face is crowned with heart-shaped ears on top.
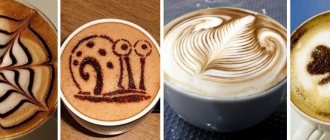
A cup of painting, please!
The idea of combining fine and culinary arts is not new, but how captivating is the coffee and milk base, which can hold a picture, patterns or phrases for some time without mixing or dissolving them. The idea was appreciated and approved by many lovers of everything extraordinary. Coffee with a pattern became popular at birthday celebrations, at family celebrations, and at small anniversaries of lovers. It turned out that with the help of a coffee cup you can confess your love, propose marriage, ask for forgiveness, and evoke the most joyful emotions. The power of art, coupled with an invigorating aroma, has created a whole movement called latte art. There is no exact information about the brilliant inventor of coffee and milk pictures. The origin of this fleeting but amazing art is associated with the order of Capuchin monks living in Italy. Just think, cappuccino is really in tune with the Capuchins, although some see a connection only with the dark brown robes of the monks. The version with a Capuchin barista, for whom drawing on coffee is more important than prayers and fasting, is very dubious, but very cute.